If you’re staring at hiking trail photos and wondering how to begin hiking, this guide trims the learning curve so you can step onto your first path with confidence. How to start hiking? Pick an easy, well-marked trail, bring the 10 Essentials, and walk at a conversational pace. That’s it. You’ll learn the rest—route finding, layering, fueling—as you go.
This is built for true first-timers and families. We’ll keep jargon light (we’ll define it), offer a simple gear list, map out your first outing step-by-step, and share a four-week progression so hiking becomes a habit, not a one-off. Along the way you’ll see what actually matters (fit shoes, water, a plan) and what can wait (ultralight widgets).
We’ll also help you find beginner-friendly routes with popular trail apps and park websites, explain basic trail etiquette so you feel at home out there, and give you quick fixes for common problems like hot spots and sudden weather shifts. Breathe in that piney air, feel the trail underfoot, and let’s get you moving.
Who this guide is for
- Beginners: brand-new hikers, parents with kids, or anyone returning to movement.
- Nervous first-timers: if “What if I get lost?” is holding you back, you’re in the right place.
- Budget minded: we’ll keep gear simple and practical.
Gear you actually need (and nothing you don’t)
Goal: carry just enough to be safe and comfortable on a short day hike (2–5 miles / 3–8 km) in fair weather.
The core kit (10 simple items)
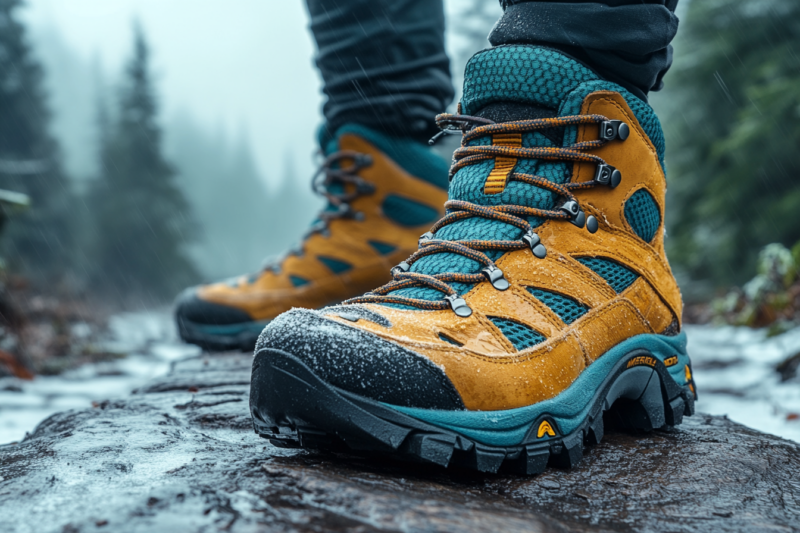
- Comfortable footwear: trail shoes or light hiking boots that fit well; avoid brand-new shoes on hike #1.
- Daypack (16–24L): enough space for layers, water, and snacks.
- Water: start with 1–2 liters for cool days; hot conditions can require up to ~1 liter per hour, so plan accordingly.
- Snacks: salty + carb-rich—trail mix, bars, fruit.
- Navigation: a paper trail map or screenshot plus phone map; download offline if possible.
- Sun protection: hat, sunglasses, sunscreen.
- Light/rain layer: a windbreaker or light shell; weather changes fast.
- Headlamp: phones die; a tiny headlamp makes you independent.
- Mini first-aid kit: bandages, blister care, any meds you need.
- Emergency “just in case”: whistle and an emergency blanket/bivvy.
Optional but nice: simple trekking poles for steep or rocky sections (reduce knee load), a hydration pack (bladder + hose) if you prefer sipping while walking.
Affiliate picks (optional):
- Starter daypack with a comfy hip belt — Get this daypack [link] (Affiliate link)
- Budget headlamp with lockout — Grab this headlamp [link] (Affiliate link)
- No-nonsense trekking poles — See the poles [link] (Affiliate link)
Pro tip: put your phone in airplane mode to save battery, and stash a small battery bank if you’ll take photos all day.
Choose your first trail (and make it a winner)
Pick distance & elevation that match your “now”
For a first outing, aim for 2–4 miles (3–6.5 km) total and <500 ft (150 m) of elevation gain on a nature trail or well-signed loop. If you can walk 45–60 minutes comfortably around your neighborhood, you can do this.
Use tools that surface easy routes
- AllTrails filters: choose Easy difficulty, set distance (2–4 mi), and toggle “Family-friendly” or “Well-marked”. Download the map for offline use if you have AllTrails+.
- Park websites: many state and national parks list beginner hikes with mileage, elevation, and seasonal notes.
Check conditions before you go
Look at the forecast, recent trip reports, and park alerts for closures or muddy sections. Toss in an extra layer if temperatures swing or if wind is expected.
Step-by-step: your first hike plan
Before you go
- Tell someone your plan. Share the trail name, start time, route, and your “back by” time.
- Pack the 10 Essentials (scaled to a day hike). Place frequently used items top/front.
- Feet first: trim nails, wear moisture-wicking socks (no cotton), and bring a spare pair in a zip bag.
- Hydrate & fuel early: drink a glass of water with a light snack 30–60 minutes before you start.
- Download your map / screenshot your route in case of spotty service.
On the trail
- Start slow. You should be able to chat while walking. If breathing feels labored, ease up.
- Sip regularly. In heat, plan for up to ~1 liter/hour; in cool weather, many beginners do well with a few big sips every 15–20 minutes. Adjust for your body, pace, and shade.
- Snack early and often. A few bites every 45–60 minutes keeps energy steady.
- Use simple navigation habits. Glance at junctions: does the map match what you see? If unsure, pause and confirm before proceeding.
- Take mini breaks. 2–3 minutes for water and views beats long, chilly sit-downs.
After the hike
- Log how it felt: distance, elevation, how your feet and knees felt, what you used/didn’t use.
- Eat and rehydrate. A salty snack and water or an electrolyte mix can help you bounce back.
- Set the next date while you’re still smiling.
Safety, etiquette, and feeling at home outside
Hydration & weather sense
Hot, dry days demand more water. U.S. National Park guidance often recommends about a quart (≈1 liter) per hour in hot conditions; cooler, shaded days require less—but always carry more than you think you need for the planned time outside. Build the habit now and you’ll feel better on every hike.
Trail etiquette (the stuff no one tells you)
- Yielding: Uphill hikers have the right of way (they’re working); step aside and smile. With horses/pack stock, step to the downhill side. Keep right on shared paths.
- Volume: Keep voices and music low; let nature’s sounds lead.
- Leashes & leave space: manage dogs responsibly; don’t block the trail at viewpoints.
For more on trail etiquette, see the National Park Service.
Leave No Trace basics (easy to remember)
These seven principles keep trails wild and welcoming.
- Plan ahead & prepare.
- Travel on durable surfaces (stay on the trail).
- Dispose of waste properly (pack it out).
- Leave what you find.
- Minimize campfire impacts (rare on day hikes).
- Respect wildlife.
- Be considerate of others.
Troubleshooting: fast fixes to common first-hike problems
Hot spots & blisters
- Feel rubbing? Stop immediately, dry your foot, and place a piece of moleskin or tape over the hot spot, then switch to your spare socks.
- Shoes too loose? Re-lace for heel lock (a.k.a. “runner’s loop”) to prevent sliding.
I’m tired halfway through
- Shorten the loop if a cut-through exists; otherwise, slow down, snack, sip, and take a 60-second “lookout break.”
- Use poles on descents to save knees and control speed.
Sudden wind or drizzle
- Layer up: a thin windbreaker or rain shell stops the shivers.
- Keep moving: warmth comes from motion; avoid long, cold rests.
A simple 4-week progression to make hiking stick
Use this as a template. Shift days to match your schedule and local weather.
Table: Four-week “Hiking for Beginners” plan (insert after this paragraph)
| Week | Hike Distance | Elevation Gain | Focus | Notes |
|---|---|---|---|---|
| 1 | 2–3 miles | <300 ft | Find rhythm | Practice sipping water and reading trail signs. |
| 2 | 3–4 miles | 300–500 ft | Pacing | Try one short climb; take two mini breaks. |
| 3 | 4–5 miles | 500–700 ft | Terrain | Add mild rocks/roots; test poles if curious. |
| 4 | 5–6 miles | 700–1,000 ft | Endurance | Bring an extra snack; start earlier and enjoy a longer view-stop. |
Why it works: gradual increases in time on feet and elevation give your joints/feet time to adapt while your navigation and packing routine become automatic.
Mini-story: a common first-timer lesson
“Alex” showed up to a 3-mile loop in brand-new socks and shoes, excited and a little nervous. Mile one felt great. By mile two, a hot spot formed on the heel. They stopped, swapped in the spare socks, and taped the spot. Problem solved in two minutes. Takeaway: pack a spare pair of socks and treat hot spots the moment you feel them—you’ll finish smiling instead of limping.
Your pre-hike checklist (print or screenshot)
- Trail chosen, map saved/downloaded; park alerts checked.
- Itinerary shared with a friend (trail + “back by” time).
- 10 Essentials packed, including headlamp and whistle.
- Water & snacks prepped for the temperature/effort.
- Sun protection, spare socks, simple first-aid.
FAQ for true beginners
Do I need hiking boots?
Not necessarily. For short, dry day hikes without heavy loads, trail shoes work well; boots add support for rough terrain or heavier packs. Fit trumps all—no pinching, heel slip, or toe bang on descents.
How much water should I carry?
In hot conditions, many parks advise about a quart (~1 liter) per hour. In cooler weather, bring at least a liter or two for short hikes and adjust based on your body and conditions. When in doubt, carry more and/or a small filter.
How do I find beginner-friendly trails?
Use AllTrails filters for Easy routes and short mileage, or browse beginner hikes on park websites. Download maps for offline use and carry a simple paper trail map as backup.
Your first hike, simplified
- Choose an easy, well-marked trail and check conditions. 2) Pack a light 10-item kit tailored to a short outing. 3) Walk your pace, sip regularly, and enjoy the view. Do that, and you’ll go from curious to confident fast.
Ready for your first steps? Pick a nearby loop, set a date, and use the checklist above. When you’re back, come browse our next guide—Beginner Day Hike Packing List—and level up.